Aerial Imagery in QGIS
In this article I'll show you how you can use QGIS to view aerial and satellite imagery by using publicly available datasets via Web Map Tile Service.
QGIS is a free tool used by people working in geographical information science, usually dealing with any kind of information related to geography, topology, cartography and such. But an insurance investigator, law enforcement agency or journalist can easily use QGIS in several ways for things like geolocation, or gain extra information on a specific area or situation. In this article I'll go over the installation of QGIS, some basics on the layout and how it can be fed with hi-res aerial imagery with a few simple clicks of the mouse.
But why would you choose to run QGIS, if you have the amazing free imagery of Google Earth, you say? Simply because there are towns or municipalities that offer extreme high resolution aerial imagery for free, sometimes up to 3.5cm, where Google Earth will 'only' provide up to 30cm resolution satellite imagery in Europe or the US, with some places up to 15cm. But the highest resolution is gained from aerial photography, and the resolution in those can be absolutely stunning. Not every city or town is covered, but I will give you the tools and tricks so you can find what is out there for your case.
Don't treat the sources that will becovered as a replacement for the latest Maxar imagery or from Google Earth that has multiple years within their timeline function. It is best to purely treat this as an extra resource. Sometimes it can be handy to have extremely hi-res imagery to identify specific details that are too blurry in satellite images. Or maybe you are looking for more context about an area that hasn't changed for years, or you want some high resolution media to use in reports or article. And maybe you have a case where you need to be able to actually read the graffiti in a certain skatepark where hi-res aerial imagery is available? In that case, keep on reading.

Download and Installation
QGIS can be downloaded from their website, and offers downloads for Windows, macOS, Linux, BSD and there are even versions for Android and Windows tablets. In this article I have used the Windows installer, but for macOS it is a lot easier since QGIS is downloaded as a standalone program, where the Windows version comes with a OSGeo4W installer. This will give the user a plethora of options, software and libraries to install, but for our purpose, we are just going to be using QGIS and nothing else.
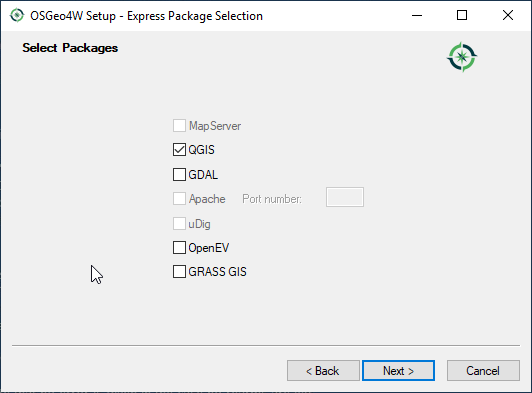
After starting the installer, we are greeted by the OSGeo4W Net Release Setup Program. Select 'Desktop Express Install' to get the latest release.

In the next screen I unselected everything besides 'QGIS' and clicked on Next.
After that we need to approve the ever-present terms of service before we can start the actual installation. In total it downloads a few hundred MB's, so make sure you have enough time and a fast connection.
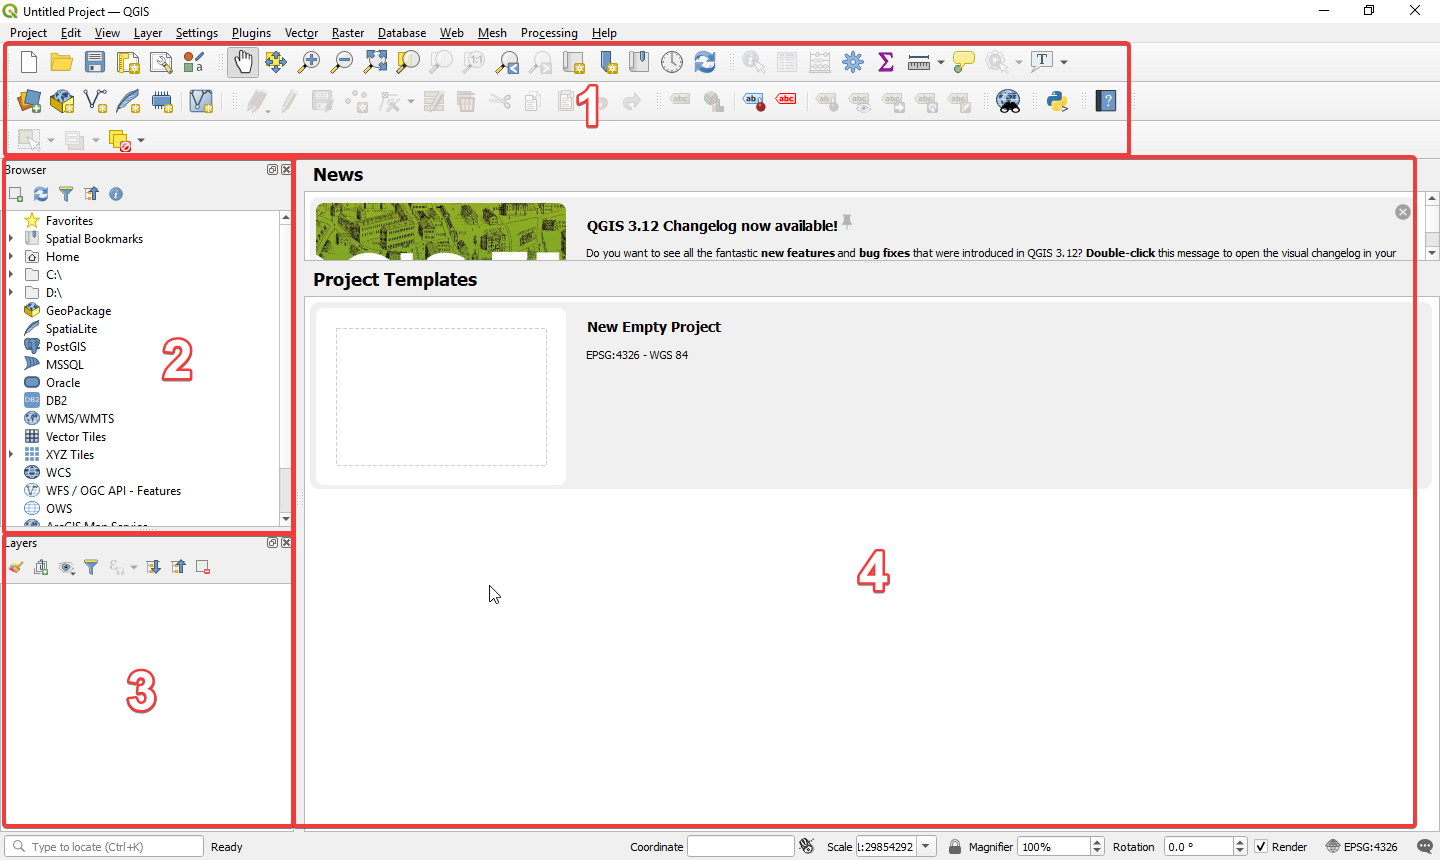
Start QGIS and the main work-area opens up that consists of a few general areas and loads of menu buttons. Don't get overwhelmed by this, since we won't be using a lot of the menus for now. On the top we have the main menu (1) with loads of buttons that open up different functionalities of QGIS. On the left we have the browser (2) where we can open local files, and under it the layers (3). The rest of the screen is filled with the general working area (4), where later on some high resolution imagery will appear.
Adding a Base Layer
What I personally like to do before I add any kind of external sources, is open a base layer, for instance from Open Street Map. This way I can already zoom towards my area of interest before I am going to look for specific datasets, and it can also be helpful to get multiple mapping services inside a single application. For this there are multiple plugins available that gives you such options. My choice would be either 'QuickMapServices'or the 'HCMGIS' plugin. With 'HCMGIS' one can choose between imagery from Google, Bing, ESRI For now I'll be concentrating on the first one. In order to install it you go to the 'Plugin' menu and open the 'Manage and Install Plugins'.

Search for the plugin 'QuickMapServices' and click 'Install Plugin'. After it has been installed and you have created a new project from the start page, you go to the 'web' menu or look for the little globe icon in the menu bar. From there you can quickly select the OSM layer to be displayed.

To illustrate why I like to add OSM as a base layer, can be seen in the next screenshot. On the left there is nothing besides the aerial imagery that was loaded, in this case the Canadian town of Regina in Saskatchewan. On the right I added a base layer, which gives me an indication of the surrounding areas, entry and exit roads, and when I turn off the imagery layer I can quickly go over the area to find a particular address, an area that looks interesting, or get some general bearing on the location before turning on the imagery layer again.

Searching Hi-res Imagery
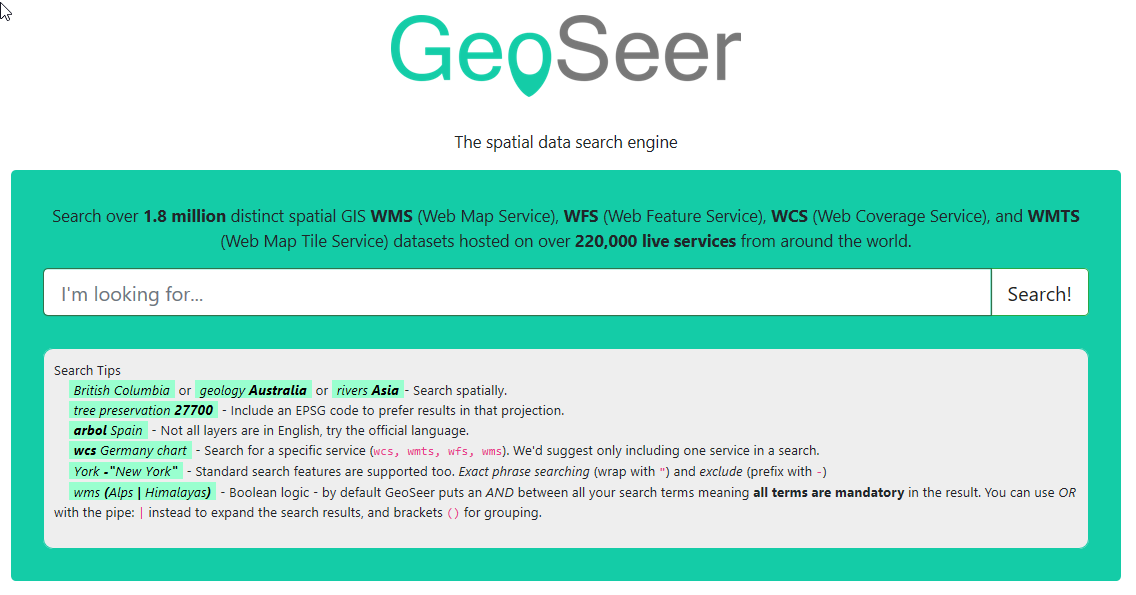
As stated above, in this article I'll be mainly focussing on getting high resolution aerial and satellite imagery. And now that we have QGIS all set-up, we are going to have a look at the spatial database GeoSeer. This website has over 1.8 million datasets from all over the world, ranging from geological information, climate datasets to imagery services. Within GeoSeer we can search manually or use the 'WebGIS' option to visually look for an area of interest. For this purpose we'll be looking at the manual search option for now.
Not every country in the world has a solid hi-res imagery provider open for the public, but a lot of areas within North America or Europe do provide such services. With the huge amount of datasets available, it might also be difficult at first to find the most useful set, and this might take some practice. But one thing you can try is to search for the area or city name of your interest in combination with one of the following words to find what is out there:
- satellite
- aerial
- photo
- airphoto
- imagery
- inch
- cm
Don't forget that it can help to search within the native language of that area, so the word 'photo' won't be helpful when searching in German speaking countries. For that, change the keyword to 'luftbilder' or simply 'bilder' if you do not get any hits using the word 'photo'. Alternatively, drop the keywords completely and only search for the specific area or city. You may have to browse a lot of links before you spot what you need. If you aren't successful searching within GeoSeer, simply Google for aerial photography that provide a WMS or WMTS connection. Another thing to try is to search for a general area, or even a city name, in combination with different resolutions, like: 5cm, 30cm or "6 inch" (with quotes).
After you have found a possibly interesting dataset, you can open the page to see the details. In this case I've opened the 3 inch aerial photography set of Carson City, Nevada.

In the details it is stated the dataset is dated 2019, has a resolution of 3 inch per pixel (or about 7,5cm/pixel), covers 252km2 and are the coordinates of the bounding box listed. Further more we also have a bunch of URL's that provide the features, map tiles, capabilities et cetera. For now this is not so important, so let's focus on the URL that is listed at the top. The URL shown there is:
http://ccapps.org:80/arcgis/services/CarsonCityAerials/2019AerialCache102100/MapServer/WmsServer?Simply click on 'Copy URL' and we are ready to add the layer to our project.
Adding Services to the Map
If you think you found a suitable or usable mapping service, you can use that. Alternatively you may want to use the Carson City example for now. After that it's time for the next steps that consists of two parts:
- Pick and connect to the dataset of your choice
- Load one or more products from within that dataset
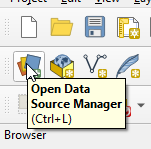 The reason is that most datasets have more than one 'product', ranging from different types of data like environmental information, or multiple years of aerial imagery. After we connect to the specific WMS service, we'll be looking at what they have on offer. First we'll click on the button 'Open Data Source Manager'. This will open a dialog box where you can add new or edit existing mapping services. First of all make sure you select the option WMS/WMTS, since that is the type of service we are going to add. Then you click on the 'New' button. In the next dialog box you give it a name and you provide the URL where the service can be reached. After this you can click 'OK' to return to the 'Data Source Manager'.

To retrieve a list of products that the mapping service provides, click on 'Connect' and it will load a list of products that are available to you. This can be a handful of lines, but there are services that have over 100 products that you can use. To find the correct data, you can use the find option on the top right, by providing keywords that you expect in the product. Think along the lines of: Aerial, photo, 10cm or anything that can hint towards satellite or aerial photography.

Note: It is possible that you receive a 'certificate error' after you connect to a service. This happens when the digital certificate that the server uses to provide a level of security is configured incorrectly. Usually I never ignore such issues, but since I'm simply requesting imagery tiles from an already public service, I'm not too scared to click the ignore button in such cases. If you don't feel happy about that, and you have enough knowledge about the issue, you can always investigate and see whether you can change the URL accordingly to fix the issue.

After you loaded the products, pick the item you are interested in and click on 'Add'. Then you can close the wizard and the imagery will be loaded in your project, ready to be viewed. If you started off with a completely blank project, it will be visible straight away. If you however added a baselayer like OpenStreetMaps before you started, you might have to zoom in to the specific are. You can quickly do that by right clicking on the layer itself and click on 'Zoom to layer', or click the correspondent looking glass icon in the menu bar.

With the aerial or satellite imagery loaded, you are ready to investigate. As an example, here is the aerial imagery from Carson City after it loaded:

And after zooming in, you are ready to identify the make and model of cars that are visible.

Tip: If you loaded a dataset in your project and you zoomed in to a location but you don't see anything, try zooming in or out. It's possible the WMS provider set a minimum or maximum zoom level.
Some Examples
There are a lot of interesting web map tile services out there that are free to use, way too many for me to list here. But to give you a few examples, here are some screenshots and information on where to find the data.

| Date | 2012 |
| Resolution | 5cm |
| WMS URL | https://www.geoseer.net/rl.php?ql=81e21158f6128d12 |

| Date | 2009-2019 |
| Resolution | Unknown (probably about 10-15cm) |
| WMS URL | https://www.geoseer.net/rl.php?ql=a5807ba612716c6d |

| Date | Unknown |
| Resolution | 25cm |
| WMS URL | https://www.geoseer.net/rl.php?ql=1942f476514292c0 |

| Date | 2013 |
| Resolution | 6" or 15cm |
| WMS URL | https://www.geoseer.net/rl.php?ql=569617f7093cad50 |
Conclusion
QGIS is a very powerful and versatile tool for anyone that works with geographical information, whether it's about maps, geological information, population, nature and weather or in this case imagery. There is a lot more that is possible with QGIS, like running OverPass queries directly from within a plugin, creating heat-maps from datasets or create handcrafted queries within QGIS itself. A nice example of what you can do with QGIS is explained by Twitter user 'BearHunt' that you can read in his Medium blog post.
In the future there will probably be a few more articles about QGIS, where I might not be focussing on geolocation, since other people are way more experienced in writing queries, but there are several other use cases for QGIS when it comes to visualising data. So keep an eye out for that. But until then, enjoy browsing the internet for interesting imagery.